DUTCH DOMESTIC REED ARROWS, AN ONGOING PROCESS OF TRIAL AND ERROR
Pliny the
elder , the 1st century ad Roman wrote in his Naturalis historia,
book XVI something very interesting about reed, and more specific, reed used
for arrows, for writing, for making flutes and for fowling and fishing.
CHAP.
65.—REEDS USED FOR ARROWS, AND FOR THE PURPOSE OF WRITING.
It is by
the aid of the reed1 that the nations of the East decide their wars; fixing in
it a barbed point, they inflict a wound from which the arrow cannot be
withdrawn. By the addition of feathers they accelerate the flight of this
instrument of death, and the weapon, if it breaks in the wound, furnishes the
combatants with a weapon afresh. With these missiles the warriors darken the
very rays of the sun.2 It is for this reason more particularly that they desire
a clear and serene sky, and hold in abhorrence all windy and rainy weather,
which has the effect of compelling them, in spite of themselves, to be at peace
with one another.
If a person
were carefully to enumerate the peoples of Æthiopia, Egypt, Arabia, India,
Scythia, Bactria, and Sarmatia, together with all the numerous peoples of the
East, and the vast realms of the Parthians, he would find that fully one-half
of mankind throughout the whole world live under a dominion imposed by the
agency of the arrow. It was their surpassing excellence in this arm that so
ennobled the warriors of Crete, though in this respect, as well as in all
others, Italy has gained the mastery; there being no reed in existence better
adapted for making arrows than that found in the Rhenus, a river of the
territory of Bononia: (the Reno river at Bologna Italy) filled with a greater quantity of pith than
any of the others, it is light, and easily cleaves the air, while at the same
time it has sufficient weight to resist the action of the wind; an advantage
that is not possessed in an equal degree by those employed among the Belgæ.
These advantages, however, are possessed by the most approved kinds that are
found in Crete, although those of India are preferred; in the opinion of some
persons, however, these last are of a totally different nature, for by adding a
point to them, the natives are able to use them as lances even. Indeed, we find
that in India the reed grows to the thickness of a tree, a fact which is proved
by the specimens which are everywhere to be seen in our temples. The Indians
assure us that in this plant, too, there is the distinction of male and female;
the body of the male being more compact, and that of the female of a larger
size. In addition to this, if we can credit the fact, a single compartment
between the joints is sufficiently large to answer the purposes of a boat.3
These reeds are found more particularly on the banks of the river Acesines.
Here we see the 1st century ad Roman
scholar making a reference to the Bologna reed, the Cretan reed, reference even
to bamboo from India, but there is also a reference made to Belgium reed- which
according to the Old Roman also is suitable for making arrows, although
inferior to the Bolgona
Reed.
So, if the
Old Roman says you can make arrows out of Belgium reed, why not give it a try
then. In the low countries, there is reed in abundance, every channel, pond or
lake is lined with it. So take a knife,
walk out of the door, and cut some reed stems, the longest and straightest ones
that grow in the middle of the bush, and get going. ..
As you can see it is really everywhere this reed stuff in the low countries.
.
The
indigenous reed in the Netherlands is the species Phragmites australis. It can grow up to 3 meters in hight, and it
is very light, brittle and flimsy. The
stems I cut out of the pond have a
diametre of some 6mm on average, are of course hollow, and the thickness of the
shaft material itself varies from approximately 1 to 1,5 mm at the bottom, to
0,5mm at the tip.
A piece of Dutch domestic reed shaft of some 84
centimeters in length can bring only 9,7 grams on the scale. Compare that to a
5/16”pine shaft of the same length – the smallest diametre wooden shaft to be
found on the market- : that will come down to 19 grams.. A Dutch domestic reed shaft is about half the weight of the lightest wooden 5/16” shafts.
Comparison between dutch domestic reed and a 5/16" pine shaft.
Weight of a Dutch Domestic Reed shaft 9.43 grams on 84 centimeters.5-16 pine makes 19 grams on that same length.
6mm diametre and 1.1 mm thickness of the shaft material.
So with the
parameters of Dutch domestic reed (6mm diametre, and only 1mm shaft material
thickness at the bottom that will decline to 0,5mm further up the shaft) there
you instantly can see the problem with making arrows out of them. How to get a sufficiently strong arrow out of
them that doesn’t explode, and has sufficient weight not to undershoot/ dry
fire your bow ?
After some
vigorous trial and error- quite some of the arrows exploded instantly on their
maiden voyage- I found out four things to counter that, and keep it manageable
and make them shootable..
A) Use as much of the bottom part of
the shaft as possible. Here you have 1 to 1,2mm on shaft material thickness.
B) Make a short arrow. The shorter the
arrow the stiffer. The longer, the wobblier and weaker it gets. Dutch domestic reed stems hav quite some
length between the nodes, varying from 14 to 19 centimeters, so in most cases you
only need three full length pieces of these to get a shaft of sufficient
length. You will have to allow for a bit
of extra on the top and the bottom to fit in a wooden foreshaft and a nock
piece.
C) So you only have to allow for straightening
and aligning four nodes . Three full length pieces and two half to 1/3 length
pieces. To get some weight on the arrow,
I prefer a longer foreshaft, lodged deep into the reed shaft, and also a longer
nock piece. Before you know it you are
even under the 5 grains per LBS rule of thumb- the undershooting barrier- with
such hyperlight shafts.
D) You need a very light arrowhead with
a small diametre socket. I go to a max of 70 grains. The heavier the arrowhead,
the more spine it will need, and more spine is simply something you cannot pry
out of these 6mm domestic reed arrowshafts.
So I go for ¼” flight piles to max 5/16 flight piles. – 40 to 65 grains. Also my bronze Thermopylae replicas of 70
grains work well on a Dutch domestic reed arrow from the pond next door. I might mount some microflints in the future as well to find
out how these will perform. I also did some experiments with a cold hammered iron nail. That worked as well, but proved less suitable to target and 3d shooting, as there is a fat chance to break the feeble reed shaft when you try to pull it out of the target (which of course it did) in the absence of longer wooden foreshaft..
Bronze trilobal thermopylae battlefield replica. 70 grains.
Cold hammered iron nail directly into the reed shaft.
Practical part: Building
Dutch domestic reed arrows.
Step 1: straightening
the reed arrowshaft.
This step
took me some trial and error. The shafts are quite feeble and split easily, so
you have to be careful where and when to apply pressure. I straighten my shafts over the gas flame of
my kitchen furnace, and straighthen ém down by hand, not using an arrow
straighthening tool. With an arrow straightener it is quite easy
to put too much pressure on a certain point, and when your shaft splits, it is
wasted. So I carefully do it by hand and
by feel, applying as much gradual arcs and gradual bending as possible. Also mind that reed heats up very quickly, so
you only need to toast it quite lightly, rolling the shaft and distributing the
heat.
Once you
have the hang of it and the feel of what reed does, it is not that difficult to
make a straight and shootable shaft. The
pieces of reed between the nodes are in most cases already straight, so you
only have to align all of the nodes into a straight line to have a straight piece
of reed. You only need 4 straight nodes
in line to get your shootable arrowshaft.
Compared to
making a wooden arrowshaft the traditional way making a reed arrowshaft involves surprisingly little work.
Step 2:
cutting the reed arrowshaft to length.
More trial
and error involved. Me and a knife don’t
go along in avoiding splitting the
arrowshaft when I cut them to length.
Nothing more frustrating than messing up a nicely and meticulously straigthened
arrowshaft. I don’t take risks anymore,
so I decided to go for a tile saw, slowly grinding around the shaft to cut it
in half.
Reed shaft with the tile saw.. Carefully grinding straight cuts without splitting the reed.
Step 3:
making a foreshaft.
This is the
part where recycling comes in handy. Broken wooden arrowshafts are perfectly
fit for a new life as a foreshaft. If
you have broken 5/16” ones, these are a good match for a reed arrow. I always
try to go for the maximum strength, so I make the insert as long as required to
make a snug fit to the node.
Recycling
does not stop there. I glue them in with
hide glue. So.. should you blow up or break your reed arrowshaft, put the
foreshaft piece into water, and the glue dissolves and it comes loose, to fly
another day on another reed shaft. All
of my reed shafts from the pond next door have the same 6mm diametre, so I don’t
have to do much to refit them on another shaft.
Reed shaft and a broken arrow.
Reed shaft and the5/16"wooden foreshaft with the insert cut to size and length
Titebond hide glue to glue the forshaft into place.
Step 4: Making a
tailpiece with a nock.
If you have a casualty with a nock intact, you
just might want to recycle that into a tailpiece as well.- provided you din’t
apply plastic nocks of course- As my
casualty rate of broken arrows is not that high, I settled for another method,
recycling arrow building stuff. I usually
build bamboo arrows, and I have to
cut these to length. And these cutoff
pieces are 9mm in diametre, and these serve
perfectly for making nocks on my domestic reed arrows. Bamboo is hollow, so I make a peg to fit into
the bamboo piece and into the reed shaft. I glue the peg into the bamboo piece, and then
I cut the nock into the bamboo piece with the glued in peg with a tile saw.. Simple
and effective.
I also glue
the nock piece in with hide glue, so I can recycle that as well once I put it
into water.
I might go
into bone nockpieces in the future.
Pieces of bamboo and a kebab stick used as a peg.
Bamboo with the peg piece glued in
Cut in the nock grove with the tile saw into the bamboo tip, and glued the tailpiece in.
Step 4: The
usual stuff. Glue on fletchings.
Even
these can come with a recycling aspect. If you have a casualty with the fletchings
intact. Break off the bottom of the broken arrow, and put it in the microwave.
After a few rounds you will notice some wisps of smoke rising, and then they
are done.. Take ém out and you can strip off the fletchings just like that..
Sand the glue off, and they are ready to fly another day. Wife will probably not approve the misuse of
kitchen equipment.. but it works..
Just until
now I have just applied what I had in store, or in the recycle bin, and haven’t
given any thought about the right size of the fletchings for optimum
performance on a domestic reed arrow.
Verdict:
Can you
shoot this?
This is the third series, the mark III´s applying everything I have learned from the previeous mark I and mark II failures.
Yes you
can! Of course these superlight and flimsy arrows are not fit for heavy bows
and immense firepower, but I CAN shoot them from my 50lbs Kaya Korean bow. And I can hit 10’s on the verge of bullseyes
with them at target at 20 meters. They
even stood up to two hours of shooting into a heavy duty stramit board.
Yup, that is really straight into the target from 20 meters with a Mark III Domestic Dutch Reed arrow.
And light
as they are, my mark III´ DDRAs´ are between 15 and 17 grams total weight...( 237 to 262 grains total weight ) they are tremendously fast. I reached almost 190fps with them on a traditional bow..
and didn’t even draw it to full length then.. that is quite impressive ( and then of course then the DDR arrow exploded in my attempts
to get it over 200 fps with a full draw). Shooting at 20 meters you hardly need any elevation. The arrows simply blasts through almost flat. But then, 262 grains on a 50lbs bow is really on the edge of dry fire, the 5lbs per grain ratio, and not to be recommended by most bowyers who will gladly recommed 10 grains per lb out of liability and warranty reasons.. . The 50lbs Kaya Nomad Korean bow I used for the tests doesnt ´seem to have the slightest problem with that 5lbs per grain though.
Almost 190 FPS.. that is fast for an arrow from a traditional bow
So yeah..
this is something that is shootable and sturdy enough to last a few shots.
Unfortunately
despite their massive launching speed they didn’t perform that equally brilliant
on distance. I could get them to 200
meters, but that was it.. This hyperlight fast arrow runs itself out of speed quite
fast. I think it has to do with air
resistance.. the faster the object, the greater the air resistace, and the
faster it runs out of speed. Of course the more erratic flight of an
underspined arrow doesn’t help. And
there is hardly any mass and and hardly any impetus behind the arrow to retain its speed. So yes.. a tad heavier and stiffer arrows do
substantially better at distance.
Still to me
the domestic dutch reed arrow, cut from the pond next door, is pretty much a shoot and forget arrow. It is
quite feeble with 6mm diametre and 1mm thickness on the shaft fabric. Once it
has a crack, it’s a goner, and will explode on the next shot with absolute
certainty.. Nevertheless within its boundaries, I managed to pry some shooting hours out of
them, and could shoot them quite accurately. You actually CAN fill the pot with these reed
things from the pond next door.
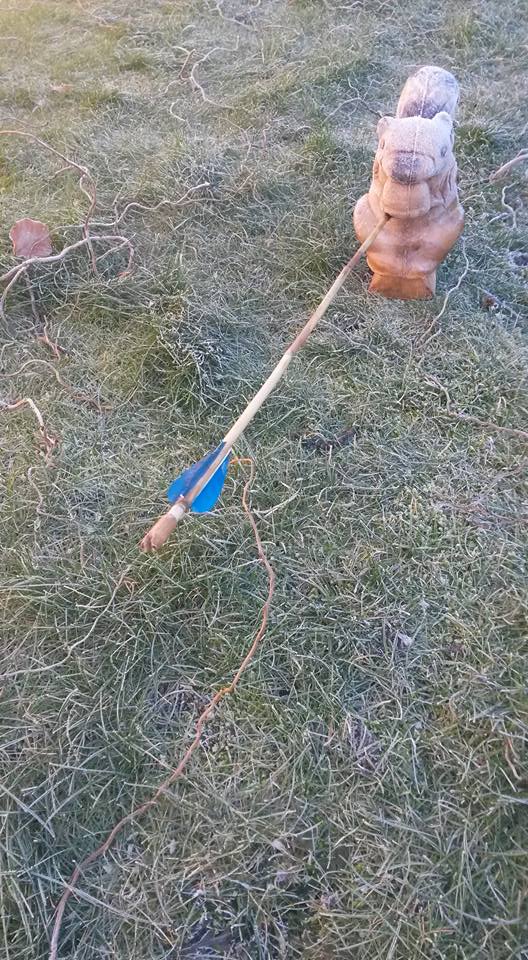
3d squirrel nailed with precision from 25 meters with mark II Dutch Domestic Reed arrow.
The virtue
of reed is that you can get it everywhere, and can make a massive amount of
arrowshafts out of it without too much
fuss. And they are also easy to
recycle.. If you have the foreshaft and the tailpiece intact, it is easy to put
on a new reed shaft.
To my
opinion this Dutch domestic next door reed is a bit too feeble for a more
general purpose like battle or warfare, but if you might find a bit stronger
reed with a larger diametre of say 9mm, and 1.2mm or more on material
thickness, I think you are definitely into business with a reed arrow. It just might be that I haven’t been able to
find it here in the Netherlands, did not look for it in the right spots, and
might do well to consult some experts who know about reed– like thatch roofing
experts , or botanists- where to find these goodies. They might be around here as well, or perhaps grow
a bit bigger and sturdier in warmer
climates, like Italy.
It is an
ongoing venture. The mad Skyth will keep you posted.
Some additional pics of my mark III Dutch Domestic Reed arrows.


Foreshaft with a 5-16 65 grains modbod target pile mounted. I deliberately took a very long foreshaft to have a good grip on it when pulling it out of the target, so I wouldn´t snap the reed shaft. Works! You can keep the arrows whole this way and get some shooting hours out of them. I did cut the forshaft down a bit though, because the original effective draw length was 33` with the long foreshaft. It´s now down to a more modest 31 inch effective draw length.
Post scriptum: Putting the Dutch Domestic Reed arrows to the (endurance) test.
Mad Skyth posing with the Kaya Nomad 50lbs and a Dutch domestic Reed arrow, applying a thumb draw.
So: You have made an arrow that flies and can hit a target from domestic reed, but what can you say about its operational reliability. There's no other way than to make a set of them, put them out on the range and see how they will fare in an afternoon of rigorous target archery.
Set of five Mark III Domestic Dutch Reed arrows. Three of them are more or less matched with 16 grams in weight and 28,5"effective draw length. There is a short one of 27" which had the foreshaft broken in test flight, but could still be mounted with an arrowhead. And there is a longer one of 32,5".. The first prototype of mij Mark III's.
First I did some testing in the 50 meters backyard on a 3d Squirrel from 20 meters with the small 27" arrow that weighs only 13,5 grams. That arrow was a bit warped, but nevertheless I found myself enjoying this litthe warrior, as I managed to nail the Squirrel quite a lot of times - even four times in a row- with this little peculiar hyperfast arrow.
That gave me some positive feeling, and I was eager to find out how all five of them would fare at the Archery Club on a Stramit Target board.
Result:
All five of the Mark III Domestic Reed Arrows perished!
Yep. .all of the five Dutch Domestic Reed Arrows are no more. .All of them perished in an epic operational endurance target battle Breda Archery this afternoon ..Rip my brave hyper light warriors.
One of them exploded.
The other four of the arrows broke at the connection between the foreshaft and the reed shaft.
Another lesson learned. .The reed arrow shafts are strong enough to propel the arrow towards its target at high speed. .but they flex too much when they are stopped dead on impact on a hard stramit target board at some 190 fps. They didnt break straight away. .but apparently this flexing and overbending on impact did fatal gradual damage. .
So after some 15 to 20 shots into the stramit they eventually all broke at the connection between the harder foreshaft and the more flexible reed tail of the arrows. ..
One exploded. .not in the first shot. .but after some 12 flights. . It may have had a flaw in the reed shaft that, after continuous stressing , eventually gave in.
It was remarkable that after one hour of shooting I still had all of my five domestic reed arrows intact, and then suddenly in the second hour they all perished at an astomishing fast rate.
So...It simply is not strong enough to provide a decent operational reliability. And that stramit target board might have been too hard.
Although I was able to hit some 4 yellows with them at 20 meters, I wasn't able to get some consistent grouping out of them. Even my three more or less matched 28,5` arrows did show slightly different flight behaviour. (of course that also might be the flaw of the archer, I cannot rule that out )
Anyways, they did not last long enough to inspire confidence, get me to know them each, and get them where I wanted them.
So.. despite the efforts and the progress I have made in this respect, my Dutch Domestic Reed arrows are still pretty much in the `shoot and forget` category.
Currently out of decent Domestic Dutch Reed shafts again. I think I will leave the project here for a while, and first and formost concentrate on finding stronger reed. I don´t think I will be able to make much more progress on the 6mm diametre 1mm internal thickness stems I cut from the pond next door.
I´ll keep you posted on further progress. I will cut some new supplies in autumn.
New career for two of the five Dutch Domestic Reed Arrows that I was alble to salvage from the endurance test carnage.
I managed to salvage two from the carnage last week in which all five of the domestic reed arrows perished in a target endurance test. They won't fly anymore but will end their career as Skythian display arrows. I mounted them with Skytian style bronze trilobal arrowheads. The one on the left is a Radostin Kolchev replica, (a Bulgarian Bronzesmith) and the right hand side one has a Neil Burridge Thermopylae battlefield replica mounted. Neil does superb work as a Bronzesmith, specialized in making bronze age swords. http://www.bronze-age-swords.com/
As you can see these light and small 70 grains bronze 5th century BC trilobal arrowheads make perfectly sense on a reed arrow.
Very light and very fast, some 15 grams total weight, but not really fit to shoot more than once because you will almost certainly bash the small socket diametre arrowheads off on inpact. (which i think was originally the intention- to keep the arrowhead lodged in the body of your target-)


